
General instructions for MacTFTP Client
SupportThese are the general instructions for using MacTFTP Client.
All the relevant controls for initiating a transfer are in the TFTP window. You can create a new TFTP window by choosing “New” from the File menu.
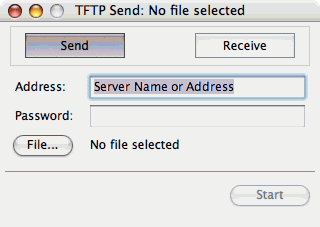
The TFTP protocol allows you to initiate either a Send or Receive with the TFTP server. Choose the appropriate option.
The “Address” field allows you to enter the name or address of the TFTP server.
The “Password” field is optional. Some systems require and will use a password. Others won’t. Note that a password is not part of the TFTP standard and will most likely be ignored by most servers.
If you are sending, the “File” button will allow you to choose the file. You can also drag-and-drop the file onto the window or onto the MacTFTP Client icon.
If you are receiving, the “File” button will allow you to name the file you wish to receive and tell MacTFTP Client where you want to place it. Note that this step does not create any file until you actually initiate the transfer.
Certain systems may require a Text transfer rather than the default Binary transfer. You can switch this setting in the Options menu. Note that no conversion actually takes place. The transfer is identical as far as MacTFTP Client is concerned. The setting is simply meant to fool the TFTP server into thinking it is a text transfer.
When all the settings above are correct, press the “Start” button to begin the transfer. You can stop the transfer at any time by pressing “Abort“.
You can initiate multiple transfers simultaneously to the same server or a different server. Choose “New” from the File menu to open another TFTP window and fill in the settings as above.
July 10th, 2008 at 12:36 pm
Hi, I am puzzled when I try to receive a file, the pop-up-box does not let me put in the exact filename required (e.g. I want to load readme.txt – but your sw wants me to put it readme.txt. ???)
Dont understand….. 🙁
May 19th, 2013 at 8:35 pm
I certainly have need for a utility like this but I receive errors when using it. firstly received a message that said that the server was not responding after a few more tries to update the firmware on my device i got an error 65 and another try it was error 64. Cant find any refference to these errors or a help button to explain. If it helped me get my device going I would certainly spend the $2.00 for this app but as it stands it looks just like another dead end.
May 24th, 2013 at 4:28 pm
When I try to send a file, I get – error: file not found. The file exists and I used the File button to select the file. So far not very impressed, and upset that I spend money on it.
May 24th, 2013 at 5:50 pm
Errors like that are reported by the router itself, not generated by the app. In other words, your router (or whatever device you are attempting to update) is reporting “file not found”, and TFTP Client is just relaying that to you. That indicates to me that you’re trying to send a file it’s not expecting, but you should contact the device’s manufacturer.