
Setting up an OpenVPN server on a Raspberry Pi
AdviceI needed a VPN server.
Well, that’s not exactly true. I had a VPN server through software running on my everyday Mac. I had set it up years ago using voodoo tricks I gleaned from the Internet, and happily used it to protect my data whenever I was connected to a public network. It worked like a charm, but only if my desktop Mac was not asleep. This was not an issue when I had a Mac Pro that was always awake, but became problematic when I replaced it with an iMac that slept after 10 minutes. If I forgot to turn off its snoozing before I left the premises, I was out of luck. So I needed a better VPN server.
Having known about the Raspberry Pi for some time, looking for an excuse to set one up, I finally decided to deploy it for this purpose practically moments before I left for a business trip where I successfully used the heck out of it and had a smooth connection while others struggled (not sure I really understand that one, but whatever). But once again I had to piece together the instructions based on bits from various web sites, and by nagging my pal Paul Lefebvre of Xojo Software.
To save others the stress, I present the instructions for setting up a Raspberry Pi without using a separate keyboard and monitor, and configuring it as an OpenVPN server that will accept both UDP and TCP connections. Since I expect corrections, check back from time to time to see if I’ve fixed or added something.
Note: These instructions are not intended for beginners. Some familiarity with the command line, networking, etc., is assumed.
What You’ll Need
These are the items you’ll need to get started. I’ve linked to some specific products for convenience but any adequate substitute will do.
- A Raspberry Pi 3
- MicroSD memory card
- A SD-card reader
- AngryIP, an IP address scanner
- ApplePi Baker, software to prepare the MicroSD card
- The image for the Raspian OS with Pixel
- An ethernet cable
- A VNC app like VNCViewer
- A dynamic DNS client, if needed
Setting Up The Pi
You’ve put the Pi in its case and now it’s time to install its software. The first step is to use ApplePi Baker to transfer the Raspian OS to the MicroSD card. This should take about 10 minutes or so, after which you can plug the card into the Pi, connect the Pi to your network using the ethernet cable, and power it up.
Note: If your network is WiFi-only, you will have to connect a keyboard, mouse, and monitor to the Pi to configure it, at least initially.
Now you’ll have to find it on the network. Remember, your router has handed out an arbitrary IP address to the Pi that you’ll have to discover using AngryIP or similar.
Next, start up Terminal and use SSH to connect to the Pi. If the IP address you discovered above was, say, 10.0.1.100, type this in the Terminal:
ssh pi@10.0.1.100
You might be asked to confirm the identity of the device and for a password, raspberry. You will change that later.
Once in, you will need to configure the options, so enter:
sudo raspi-config
You will get a window that looks something like this:
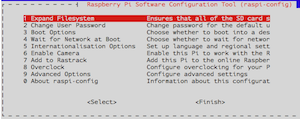
Use the options to “Expand Filesystem” and “Change User Password”. Next use “Boot Options” to turn on “Desktop Autologin”. Finally go to “Advanced Options” and turn on “VNC”. (You can set other options too, but these are the ones we need right now. You can return later using raspi-config or through the GUI.) Use the right arrow to get to the “Finish” button and let it restart the Pi.
Note: The Pi’s IP address will probably remain the same, but you can confirm using AngryIP if needed.
Setting Up VNC
Install the VNCViewer software you downloaded earlier. (Just the viewer, not the server.) Start up the Viewer and enter the Pi’s IP address. The username is “pi” and the password is whatever you set in the earlier step.
Why do we need this software instead of using the Mac’s built-in screen-sharing? With the new Pi configuration, the native VNC won’t work until we change a setting. If you’re fine using VNCViewer, you can skip the next step.
At the Pi desktop, you’ll notice a “VNC” icon in the toolbar at the top of the screen. Right-click it and choose “Options…”. In the window that appears, choose “Security” from the left and change Authentication to “VNC password” on the right. Press OK, then go the Pi menu in the upper-left and use “Shutdown” to reboot. After the Pi restarts, you should be able to connect using the native VNC software from the Go menu -> “Connect to Server…” with vnc://10.0.1.100. (Remember, this is just an example IP address.)
You might notice that the VNC screen is really, really small. You can fix that by backing up /boot/config.txt and adding the following:
hdmi_group=2

hdmi_mode=28

hdmi_ignore_edid=0xa5000080
After restart, the VNC screen will be larger. You can use different values for hdmi_mode to get different sizes.
Setting a Static IP Address
To access your VPN server while out and about, you will need to connect to your network using a dynamic host name, like the kind you’d get from DynDNS, or a static, public IP address. Setting these up is outside the scope of this post.
Internally, the Pi must have a static, private IP address. There are two ways to do this: assign an IP address to the Pi manually or use your DHCP server to assign an address based on the Pi’s MAC address. I strongly believe that the latter is the “right” way, but whichever you choose, you should do it at this point.
Note: If you intend to connect your Pi through WiFi, you can do that through VNC, then restart to make sure it stays connected. I do recommend ethernet if possible, however.
Note: You can discover the Pi’s network MAC address using ifconfig on the command line.
Installing and Configuring OpenVPN
It’s time to install and configure the OpenVPN server software. I was going to review this step-by-step, but someone beat me to it and even posted pictures, so head over to this link and follow the instructions you find there.
Note: As that post says, it’s not necessary to change the default certificate information, but if you are really in that mood, use the spacebar to mark the fields you want to modify before continuing past that screen.
Fine Tuning
At this point, you should have a fully-functioning VPN server, but we can make it better.
First, when you generate a configuration file for a new account, you might want it to specify a hostname or other options, so modify /etc/openvpn/easy-rsa/keys/Default.txt. Backup first and be careful not to touch values you don’t recognize or understand.
Next you might want two instances of the VPN server, one on UDP (the default) and the other on TCP. Why? Some public networks might block the UDP traffic but cannot block TCP 443, the same port used for secure web connections. UDP is preferred because it’s faster, but it’s good to have an alternative.
Start by duplicating /etc/openvpn/server.conf to /etc/server-tcp.conf (or whatever name you’d like). Modify the original (after backing up) to look something like this:
dev tun

proto udp

port 1194

ca /etc/openvpn/easy-rsa/keys/ca.crt

cert /etc/openvpn/easy-rsa/keys/pivpn.crt

key /etc/openvpn/easy-rsa/keys/pivpn.key

dh /etc/openvpn/easy-rsa/keys/dh2048.pem

server 10.8.0.0 255.255.255.128

# server and remote endpoints

ifconfig 10.8.0.1 10.8.0.2

# Add route to Client routing table for the OpenVPN Server

push "route 10.8.0.1 255.255.255.255"

# Add route to Client routing table for the OPenVPN Subnet

push "route 10.8.0.0 255.255.255.128"

# your local subnet

push "route 10.0.1.100 255.255.255.0"

...
Note: Again, 10.0.1.100 represents the static IP address you’ve assigned to your Pi.
Note: There are more lines in the file than what I’ve indicated. Leave those alone.
Modify the second configuration file to look like this:
dev tun

proto tcp

port 443

ca /etc/openvpn/easy-rsa/keys/ca.crt

cert /etc/openvpn/easy-rsa/keys/pivpn.crt

key /etc/openvpn/easy-rsa/keys/pivpn.key

dh /etc/openvpn/easy-rsa/keys/dh2048.pem

server 10.8.0.128 255.255.255.128

# server and remote endpoints

ifconfig 10.8.0.128 10.8.0.129

# Add route to Client routing table for the OpenVPN Server

push "route 10.8.0.128 255.255.255.255"

# Add route to Client routing table for the OPenVPN Subnet

push "route 10.8.0.128 255.255.255.128"

# your local subnet

push "route 10.0.1.100 255.255.255.0"
To start the second instance with server-tcp.conf, use this:
sudo systemctl start openvpn@server-tcp
So what have we done? The first, original VPN server will respond to UDP connections on port 1194 and hand out addresses in the range of 10.0.8.2 through 10.0.8.126. The second instance will listen to TCP port 443 and assign addresses in the range of 10.0.8.130 through 10.0.8.254. Each connection will be able to reach your network devices and each other without conflict.
Note: If you need more than 125 connections per instance, you can modify the ranges and subnets accordingly.
To configure the clients, duplicate the configuration file and use a text editor to change its values. For example, the original file might look like this:
client

dev tun

proto udp

remote your.server.address 1194

...
The second one should look like this:
client

dev tun

proto tcp

remote your.server.address 443

...
Remember to forward ports UDP 1194 and TCP port 443 to your Pi, and you’re done.
Except…
My OpenVPN Server Monitor Project
Once setup, I wanted a way to monitor the connections. When I couldn’t find anything satisfactory, I create an app that will run on the Mac, Linux, Pi, and, presumably, Windows. Take a look at the open-source here.
If you are interested in writing your own software for the Pi (or Mac, Windows, or Linux desktop, iOS, the web, or, soon, Android), check out Xojo and start with their Pi documentation.
Changing Your Network Subnet
I decided to change my network subnet from 10.0.AA.XX to 10.0.BB.XX, but getting the Pi to cooperate wasn’t so straightforward. Even though its IP address is assigned by the router, it was acting like a static IP address was set.
It turns out, it was, just not in an obvious way.
During set up, the private, static IP address I chose was stored in /etc/dhcpcd.conf. If you need to make a change, modify that file first.
Please post your comments and recommendations below. As mentioned, I’ll modify this post over time to fill in gaps and add new, useful information.