Configuring your computer to work with a cable or DSL router such as the Linksys family of routers

Support No Comments »

(When purchasing equipment, support is an important part of the purchase decision. If you are unhappy with the support you have received from a company, you should consider purchasing and recommending competing products.)

Select Your Operating System:

  • If you have a Macintosh and are running OS X 10.5 or later, click here.
  • If you have a Macintosh and are running OS X before 10.5, click here.
  • If you are using Windows 95, 98 or ME, click here.
  • If you are using Windows XP, NT or 2000, see your owner’s manual.
  • If you have a Macintosh and are running OS 9, click here.
  • For instructions on configuring the router, please read the instructions that came with your router.
  • For the Linksys Owner’s Manual in Adode Acrobat (pdf), click here.
  • For general Linksys technical support, click here.


Macintosh OS X 10.5 or Later

  1. From the Apple Menu, choose System Preferences.
  2. Click on the Network Icon.
  3. From the list on the left side of the window, select Ethernet> or Built-in Ethernet.
  4. Under the Configure: popup menu, select Using DHCP.
  5. Click the Apply button.
  6. Close the window.

OS X Settings (Leopard)


Macintosh OS X Before 10.5

  1. From the Apple Menu, choose System Preferences.
  2. Click on the Network Icon.
  3. Under the Show: popup menu, select Built-in Ethernet.
  4. Click the TCP/IP tab
  5. Under the Configure: popup menu, select Using DHCP.
  6. Click the Apply Now button.
  7. Close the window.


Windows 95, 98 or ME

  1. Click the Start button. Select Settings and then Control Panel.
  2. Double-click the Network icon.
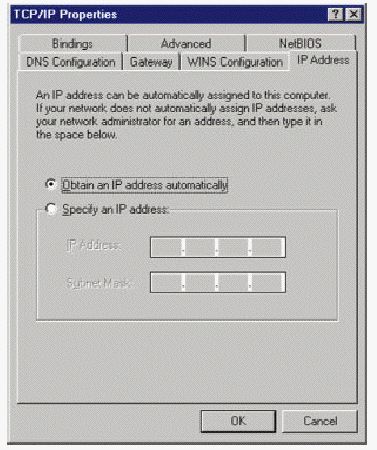
  3. In the Configuration window, select the TCP/IP protocol line associated with your network card/adapter. If there is no TCP/IP protocol line listed for your card/adapter, go to the Installing the TCP/IP Protocol section in the Appendix to install the TCP/IP protocol now. Note: These instructions apply only to Windows 95, Windows 98, and Windows ME machines. For TCP/IP setup under Windows NT or 2000, see your Windows manual.

Windows Settings


Macintosh OS 9

  1. From the Apple Menu, choose Control Panels and then TCP/IP.
  2. From the File menu, select Configurations.
  3. Click the Duplicate… button.
  4. Enter “DHCP” and click OK.
  5. Click the Make Active button.
  6. Under the Connect via: popup menu, select Ethernet.
  7. Under the Configure: popup menu, select Using DHCP Server.
  8. Close the window, click Save.

OS 9 Settings

Updating a Hawking router using MacTFTP Client

Support No Comments »

Please note MacTechnologies is not affiliated with Hawking. For support with a Hawking product, please go to the Hawking Web Site.

1) Ensure bipgate.bin is located on your drive.

2) Put MacTFTP Client into “Receive” mode and specify a file name of “upgrade” and the router’s IP address. Let it get that file.

3) Switch to “Send” mode and send the “bipgate.bin” file.

Updating a Linksys Router using MacTFTP Client

Support 8 Comments »

Please note MacTechnologies is not affiliated with Linksys. For support with a Linksys product, please go to the Linksys Web Site.

  1. Download the firmware file from Linksys’ site. You can click here to search for the latest update on VersionTracker.
  2. If needed, change the last three letters of the downloaded file from “exe” to “zip”.
  3. Drop the file onto StuffIt Expander. Note: You must have the newest
    versions of StuffIt Expander and DropStuff, both available from
    http://www.aladdinsys.com/
  4. Once the file is decompressed, you will have a folder. Inside that folder
    is a file called “code.BIN”. This is the firmware file.
  5. Press the reset button on the front of the router with a paper clip for ten seconds.
    Start MacTFTP Client. For the address, put in “192.168.1.1″. Enter your password in the password field. If that password doesn’t work, use the default password, “admin”. For the file, select or drop the “code.BIN” file.
  6. Start the transfer. It should go through without a hitch and should last
    less than thirty seconds.
  7. Press the reset button on the router.
  8. You may have to reset the settings in your router, including the password, as per the Linksys manual.

General instructions for MacTFTP Client

Support 4 Comments »

These are the general instructions for using MacTFTP Client.

All the relevant controls for initiating a transfer are in the TFTP window. You can create a new TFTP window by choosing “New” from the File menu.

Screenshot of MacTFTP Client

The TFTP protocol allows you to initiate either a Send or Receive with the TFTP server. Choose the appropriate option.

The “Address” field allows you to enter the name or address of the TFTP server.

The “Password” field is optional. Some systems require and will use a password. Others won’t. Note that a password is not part of the TFTP standard and will most likely be ignored by most servers.

If you are sending, the “File” button will allow you to choose the file. You can also drag-and-drop the file onto the window or onto the MacTFTP Client icon.

If you are receiving, the “File” button will allow you to name the file you wish to receive and tell MacTFTP Client where you want to place it. Note that this step does not create any file until you actually initiate the transfer.

Certain systems may require a Text transfer rather than the default Binary transfer. You can switch this setting in the Options menu. Note that no conversion actually takes place. The transfer is identical as far as MacTFTP Client is concerned. The setting is simply meant to fool the TFTP server into thinking it is a text transfer.

When all the settings above are correct, press the “Start” button to begin the transfer. You can stop the transfer at any time by pressing “Abort“.

You can initiate multiple transfers simultaneously to the same server or a different server. Choose “New” from the File menu to open another TFTP window and fill in the settings as above.

Copyright © 2024 MacTechnologies Consulting. Apple, Mac and Macintosh are registered trademarks of Apple Inc.