Avoiding wake-from-sleep crashes with the TouchBar MacBook Pro

Advice, Support No Comments »

Man this new MacBook Pro is nice. It’s light, fast, cool, sharp, and its keyboard is the best of the “flat” variety. Even the TouchBar is surprisingly useful.

But what’s this? Whenever it woke from sleep, some apps almost always crashed, including my own RegExRX. What’s that about?

Read the rest of this entry »

Troubleshooting Mail.app issues

Advice, Support 1 Comment »

One of the questions I often get from users of Mail.app results from a less-than-descriptive error message: “Cannot send message using server XXX”. It suggests a problem with your mail server when, in reality, the problem is with the message itself.

The next time you see an error message like that, press the “Edit Message” button, then check all the addresses in the To, CC and BCC fields. If the address is in a blue bubble, click on it to see which address is checked. If you find one that doesn’t look right (no “@some.domain” or similar problem), correct it and try sending again. For example, if you are typing quickly, you might inadvertently address a message to “fred” when you meant to send it to “fred@domain.com”.

If the addresses look right, check the size of your attachments. As a general rule, your attachments shouldn’t exceed 5 MB.

Can’t see an issue so far? Go to your web browser and make sure you actually have a connection to the Internet. Sometimes you will get disconnected for some reason or another, and Mail doesn’t warn you of that.

Finally, call us and we’ll be happy to troubleshoot.

Upgrading MobileMe calendars

Advice, Support No Comments »

If you use MobileMe and take advantage of the option to synchronize your data, like contacts and calendars, you might be aware that Apple has changed something behind the scenes and has asked you to “upgrade” your calendars. What may not be clear is what that means and how best to do it.

Read the rest of this entry »

Convert a video for your iPod or iPhone

Advice, Support 2 Comments »

iphone-video-camera.jpgNow that iPhones and video iPods have become so popular, you may be wondering how you can convert your videos to work on these devices. Luckily, several developers have created easy-to-use, often free, programs that make video playback and conversion as simple as a click.

If you already have a video that you want to convert for your iPod/iPhone, then the free iSquint is just what the doctor ordered. iSquint is a video conversion app for Mac OS X that’s many times faster than QuickTime Pro, works with almost all popular video formats, and is also really easy to use. You just drag in your file, choose “TV” or “iPod” size, set your quality, and then click start.

If you want to be able to convert just about any video to any format, the same developer makes an inexpensive program called VisualHub. The nice thing about this software is that it has preset choices for the iPod, TiVo or web sites that remove all of the technical complexities of video conversion while still allowing you to tweak the settings manually if you prefer.

But what if you just want to play a particular video in iTunes or QuickTime? In that case, a video codec for the particular format must be installed. To cover most of the bases, make sure you’ve installed the two most important video codecs that Apple does not include: Perian and Flip4Mac.

Perian, while not a video codec by itself, installs a preference pane which contains most current video codecs that Apple doesn’t license and many older and lesser used video codecs. Flip4mac installs the Macintosh versions of the Windows Media codecs. Unfortunately, if the video is using a DRM-protected version of Windows Media, you won’t be able to play it in on your Mac until Microsoft allows it.

If you’ve found a stubborn video file that still won’t play, and you’re sure it isn’t a DRM protected Windows Media file, don’t give up yet. The free VLC Player can play just about any video file.

How about the DVD that you’d like to watch on the plane without taking the disk? If it’s a Disney DVD or other commercial studio DVD, it is probably encoded with Macrovision, and the free MacTheRipper will allow you to copy the DVD to your hard drive without the Macrovision or region code for your private, non-commercial use only.

If you’d like to convert that decoded DVD you just saved for your iPod or iPhone, then the free HandBrake program is fast and easy. Even better, if the DVD isn’t Macrovision encoded, you can just run HandBrake.

With these tools, you should be able to watch just about any DVD or video on your Mac, iPod, or iPhone. Don’t forget to thank or donate to the hard working developers who made this possible, and enjoy your videos!

Upgrading to Leopard

Advice, News, Support 2 Comments »

Since I know some of you will ignore my advice about waiting a few weeks (or months) before upgrading to Leopard, here are some tips if you want to do it yourself:

- Buy Leopard. It’s not free, and there is no “upgrade” version, nor can you download it from the Internet. Not legally, anyway.

- Check your drive for corruption. If there is directory corruption on your hard drive, any major installation could worsen it and leave your Mac inoperable. While this is very unlikely with modern Macs, it’s best to leave nothing to chance and, at the very least, start up from an alternate disk (like your backup) or the Tiger Installer and run “Repair Disk” from Disk Utility. If you have a current version of DiskWarrior, that would be even better. Backing up before a repair is always recommended.

- Sync your iPhone, iPod, Treo or whatever else you normally sync to your Mac. There may be problems with synchronization later, and it will be good to know that you have a backup of that data. As of this writing, for example, The Missing Sync v.6.0.1 (my preferred app for synchronizing the Treo) is not compatible with Leopard. [Update: Missing Sync has since been updated. See here.]

- Perform a Software Update. There might be firmware updates available that Leopard will require so go to the Apple menu and choose Software Update to see. Be sure to repeat this step until you are told that there are no further updates, and do not skip ones that you are “sure” you don’t need. It would be a good idea to backup before performing this step (see below).

- Check for updates to your existing applications. Many programs will already run without issues in Leopard, but quite a few have already been updated specifically for the new System. Be sure to review your applications, plug-ins and other software to be sure that you have the latest versions. A good resource for this is VersionTracker (http://www.versiontracker.com) where you can search for software by name to find the latest.

- Repair permissions. This is a maintenance routine that should be performed after every System update or before a major System installation. You can do by going to Applications/Utilities/Disk Utility, highlighting your startup drive and pressing the “Repair Permissions” button.

- Backup, preferably twice. The last thing you should do just before installing anything major is backup your system. In fact, it would be preferable to do two backups, one that you can hold onto while you test the new installation. My idea of a backup includes “cloning” your entire startup drive to an external hard drive. That way, if there is a major problem, you can clone the external back to the startup drive to revert back to the previous system. Be sure to test the backup before proceeding.

- Disconnect peripherals, especially the backup drives. There was a bug in one of the older system installers that could lead to data loss on external drives, and while that’s unlikely to happen again, it’s always safer to make these unavailable before starting the process. As for other types of peripherals, the fewer there are, the less chance that something external will interfere with the process. Be sure to disconnect hard drives the right way by ejecting them first.

- Perform an “archive & install”. During the installation process, you will come to a screen that will ask you to choose an installation drive. There is an “options” button there that will give you the choice of using “archive & install”. This means that the installer will put aside your existing System and install Leopard as if there had been nothing there before. If you check the “preserve…” button that is directly below that option, all of your files will remain in place and intact, although some applications might need to be reinstalled to regain full functionality. “Archive & install” is the safer choice as it will prevent any existing problems (even ones of which you are unaware) from reappearing, or even worsening, in the new System.

- Don’t skip the disk check. When you first start the installation, Leopard will start checking the installation DVD to make sure it is free of defects. Because this is a time-consuming process, you might be tempted to skip it, but a faulty disk will lead to a partial installation that will render your Mac inoperable, so let it finish.

- Repair permissions again. Yes, it’s redundant, but often safer with any new install.

- Test, test, test. Before you get down to any real work, test the new system. Does Safari work as you expected? Can you edit that video in Final Cut? Is Microsoft Word and Excel allowing you to save documents? If you find a major problem early before you’ve changed any real data, you can revert to your backup with minimal fuss and wait until the problems are corrected before trying again.

- Do NOT run any disk utilities after upgrading until you are sure they are compatible. Do not mess with DiskWarrior, TechTool or anything else until the manufacturer has announced that the version you have is compatible or (more likely) has released an update to make them compatible.

Performing these steps will ensure a smooth upgrade to Leopard and safety net in case things go awry. I realize that there are steps here that require more how-to information so feel free to ask about anything that gives you pause.

But don’t be surprised if my first answer is, “you should wait.”

Configuring your computer to work with a cable or DSL router such as the Linksys family of routers

Support No Comments »

(When purchasing equipment, support is an important part of the purchase decision. If you are unhappy with the support you have received from a company, you should consider purchasing and recommending competing products.)

Select Your Operating System:

  • If you have a Macintosh and are running OS X 10.5 or later, click here.
  • If you have a Macintosh and are running OS X before 10.5, click here.
  • If you are using Windows 95, 98 or ME, click here.
  • If you are using Windows XP, NT or 2000, see your owner’s manual.
  • If you have a Macintosh and are running OS 9, click here.
  • For instructions on configuring the router, please read the instructions that came with your router.
  • For the Linksys Owner’s Manual in Adode Acrobat (pdf), click here.
  • For general Linksys technical support, click here.


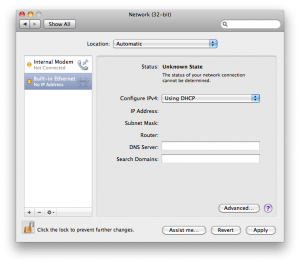
Macintosh OS X 10.5 or Later

  1. From the Apple Menu, choose System Preferences.
  2. Click on the Network Icon.
  3. From the list on the left side of the window, select Ethernet> or Built-in Ethernet.
  4. Under the Configure: popup menu, select Using DHCP.
  5. Click the Apply button.
  6. Close the window.

OS X Settings (Leopard)


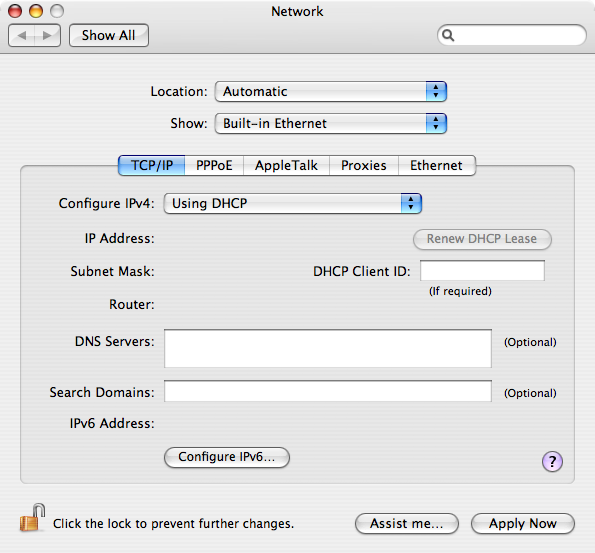
Macintosh OS X Before 10.5

  1. From the Apple Menu, choose System Preferences.
  2. Click on the Network Icon.
  3. Under the Show: popup menu, select Built-in Ethernet.
  4. Click the TCP/IP tab
  5. Under the Configure: popup menu, select Using DHCP.
  6. Click the Apply Now button.
  7. Close the window.


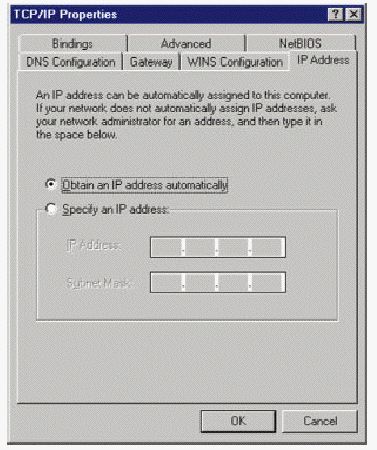
Windows 95, 98 or ME

  1. Click the Start button. Select Settings and then Control Panel.
  2. Double-click the Network icon.
  3. In the Configuration window, select the TCP/IP protocol line associated with your network card/adapter. If there is no TCP/IP protocol line listed for your card/adapter, go to the Installing the TCP/IP Protocol section in the Appendix to install the TCP/IP protocol now. Note: These instructions apply only to Windows 95, Windows 98, and Windows ME machines. For TCP/IP setup under Windows NT or 2000, see your Windows manual.

Windows Settings


Macintosh OS 9

  1. From the Apple Menu, choose Control Panels and then TCP/IP.
  2. From the File menu, select Configurations.
  3. Click the Duplicate… button.
  4. Enter “DHCP” and click OK.
  5. Click the Make Active button.
  6. Under the Connect via: popup menu, select Ethernet.
  7. Under the Configure: popup menu, select Using DHCP Server.
  8. Close the window, click Save.

OS 9 Settings

Updating a Hawking router using MacTFTP Client

Support No Comments »

Please note MacTechnologies is not affiliated with Hawking. For support with a Hawking product, please go to the Hawking Web Site.

1) Ensure bipgate.bin is located on your drive.

2) Put MacTFTP Client into “Receive” mode and specify a file name of “upgrade” and the router’s IP address. Let it get that file.

3) Switch to “Send” mode and send the “bipgate.bin” file.

Updating a Linksys Router using MacTFTP Client

Support 8 Comments »

Please note MacTechnologies is not affiliated with Linksys. For support with a Linksys product, please go to the Linksys Web Site.

  1. Download the firmware file from Linksys’ site. You can click here to search for the latest update on VersionTracker.
  2. If needed, change the last three letters of the downloaded file from “exe” to “zip”.
  3. Drop the file onto StuffIt Expander. Note: You must have the newest
    versions of StuffIt Expander and DropStuff, both available from
    http://www.aladdinsys.com/
  4. Once the file is decompressed, you will have a folder. Inside that folder
    is a file called “code.BIN”. This is the firmware file.
  5. Press the reset button on the front of the router with a paper clip for ten seconds.
    Start MacTFTP Client. For the address, put in “192.168.1.1″. Enter your password in the password field. If that password doesn’t work, use the default password, “admin”. For the file, select or drop the “code.BIN” file.
  6. Start the transfer. It should go through without a hitch and should last
    less than thirty seconds.
  7. Press the reset button on the router.
  8. You may have to reset the settings in your router, including the password, as per the Linksys manual.

General instructions for MacTFTP Client

Support 4 Comments »

These are the general instructions for using MacTFTP Client.

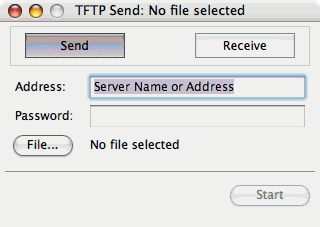
All the relevant controls for initiating a transfer are in the TFTP window. You can create a new TFTP window by choosing “New” from the File menu.

Screenshot of MacTFTP Client

The TFTP protocol allows you to initiate either a Send or Receive with the TFTP server. Choose the appropriate option.

The “Address” field allows you to enter the name or address of the TFTP server.

The “Password” field is optional. Some systems require and will use a password. Others won’t. Note that a password is not part of the TFTP standard and will most likely be ignored by most servers.

If you are sending, the “File” button will allow you to choose the file. You can also drag-and-drop the file onto the window or onto the MacTFTP Client icon.

If you are receiving, the “File” button will allow you to name the file you wish to receive and tell MacTFTP Client where you want to place it. Note that this step does not create any file until you actually initiate the transfer.

Certain systems may require a Text transfer rather than the default Binary transfer. You can switch this setting in the Options menu. Note that no conversion actually takes place. The transfer is identical as far as MacTFTP Client is concerned. The setting is simply meant to fool the TFTP server into thinking it is a text transfer.

When all the settings above are correct, press the “Start” button to begin the transfer. You can stop the transfer at any time by pressing “Abort“.

You can initiate multiple transfers simultaneously to the same server or a different server. Choose “New” from the File menu to open another TFTP window and fill in the settings as above.

Copyright © 2024 MacTechnologies Consulting. Apple, Mac and Macintosh are registered trademarks of Apple Inc.